Pages

Friday, May 29, 2009

Wheat Sandwich Bread

Wheat bread cooling
After several attempts with the Artisan Bread in Five Minutes method, I realized two things:
1. My kitchen is generally too cold for yeast dough to rise properly.
2. This recipe just doesn’t work for me.

So I moved on. We were always able to eat the bread, but it wasn’t replacing the expensive Brownberry bread we used for sandwiches. (Even on sale I couldn’t do better than $2 per loaf.) Luckily I did not buy the cookbook.

A lot of searching on Google, following a link trail around various blogs, led me to the Breadtopia blog, which included tutorials on Cook’s Illustrated’s Almost No-Knead Bread. This recipe calls for about 1/2 cup of beer. I have used both Leinenkugel and Budweiser. Darker beer definitely gives a better flavor to the finished loaf.


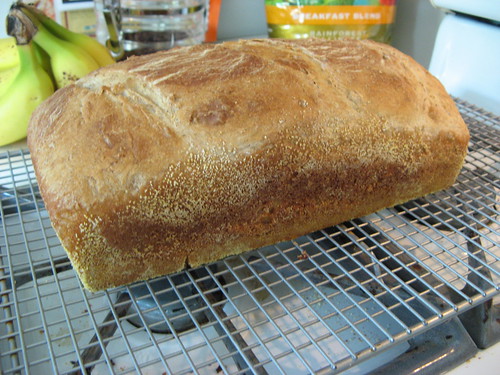
I made the sandwich loaf variation, using my 10x5 pan because it’s the only one I have. I also add about ½ cup of instant oats for texture and flavor. Given my previous problems with rising, I let the dough rise for about 18 hours at room temperature, then kneaded it, shaped it in the pan, oiled and slashed the surface, then allowed it to rise again in the pan.

In the multiple times I’ve made this recipe, I’ve tried two methods for improving the second rise. I’ve placed the pan on top of an oven set to 200 degrees for an hour or two and I’ve allowed the bread to rise all day. It may just be my oven, but I get no additional lift in the baking process, so this second rise is crucial.

The finished product is far more successful than the Artisan Bread. It’s not as tall as a store-bought sandwich loaf, but I can control exactly what goes into it, it takes very little hands-on time to make, and it’s cheaper than the Brownberry.

Wheat bread sliced

This bread stores well. It has a nice, soft crust suitable for sandwiches. I slice it as needed and store in a zip top bag in the refrigerator. It stays soft for about ten days.

Friday, May 1, 2009

Quick Cookies for Toddlers

pile of tiny banana cookies
If you’ve spent much time with a toddler, then you’ve probably seen some of the cookies marketed specifically to this age group. Teddy Grahams, Annie’s bunnies, Honey Maid honey bees, and Earth’s Best alphabet cookies are a few types, and they are fairly expensive. Not only that, but no matter how organic the brand, they’ve all got preservatives. If you have twenty minutes, you can save some money and make your own. If you're brave and don't mind a little mess, let your child help you. Kids love to help measure ingredients.


Mom's helper
Tiny Toddler Cookies
¼ cup butter or shortening
¼ cup mashed banana or applesauce
¾ cup sugar
½ tsp vanilla
1 egg
½ tsp baking soda
½ tsp salt
1 ¼ cup flour

Variations: Add 1/3 cup mini chocolate chips, diced dried fruit, or nut pieces if no allergies are present. Peanut butter, any other nut butter, or sunbutter may also be used in place of the fruit. White or brown sugar is up to your preference. Using all brown sugar results in a moister cookie. For the flour, you may use all whole wheat, but the cookie will be tougher. I recommend at least ¼ cup of the flour be white.

Preheat oven to 350.
Cream together butter/shortening with fruit and sugar, then add vanilla and egg. Mix until well combined. Add baking soda and salt, blend well. Then add flour slowly until dough is thick and only slightly sticky.
Drop dough by teaspoonfuls onto a cookie sheet with a little space around each one, as they will spread slightly.
Bake 4-6 minutes or until slightly browned. Cool briefly and then remove to a cooling rack. Cookies will store for 3-4 days at room temperature, two months in the freezer. Alternatively, bake only one pan and freeze the remaining dough, either in one block or in cookie-sized pieces for later baking. Uncooked dough will remain fresh for two months in the freezer.

tiny banana cookies
The first time I tried this recipe, I made the entire batch for my 20 month old with a small appetite. He ate them enthusiastically for a few days. He tends to get burnt out on everything after a few days, so the rest of the batch went stale. Subsequently, I started making a single pan and then freezing the rest.
While I like the look and ease of drop cookies, this works equally well as cookie bars. Just press the dough into a 9x13 pan (it doesn’t matter if it doesn’t touch the sides) and bake as before. The dough will likely take longer to cook, so watch it carefully. Slice into tiny bites with a pizza cutter or knife shortly after removing from the oven. Allow to cool then store.